Showing posts with label crafts. Show all posts

Saturday

DIY Mini Book

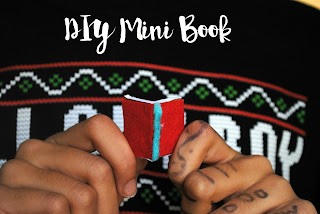
Hello everyone! Finally, I have a little (literally) DIY for you! It's a mini book that you can make out of things around your house :D Here goes:


You Will Need:

-Felt/fabric
-Cardboard
-Paper


Step 1

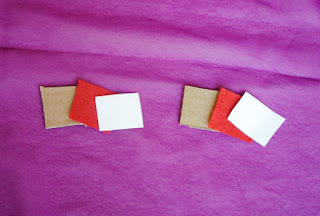
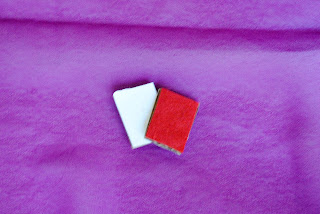
First, cut out 2 small pieces of cardboard (mind were 1 inch x 1 1/4 inch) and 2 pieces of felt and paper the same size.


Step 2

Now glue the paper on one side of each of the cardboard pieces and the felt on the other side.


Step 3

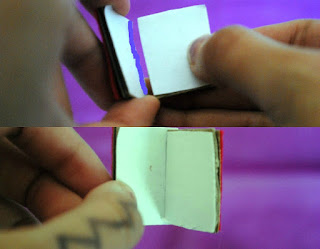
Take a hot glue gun or some strong adhesive and glue the two pieces together like an open book. 

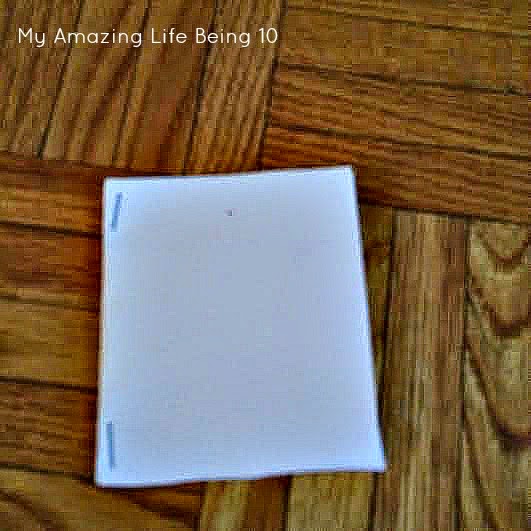
So take the right part of the book, put some hot glue on the left side (the side that shouldn't be covered with paper) of it and place it where the blue line is on the picture:


Step 4

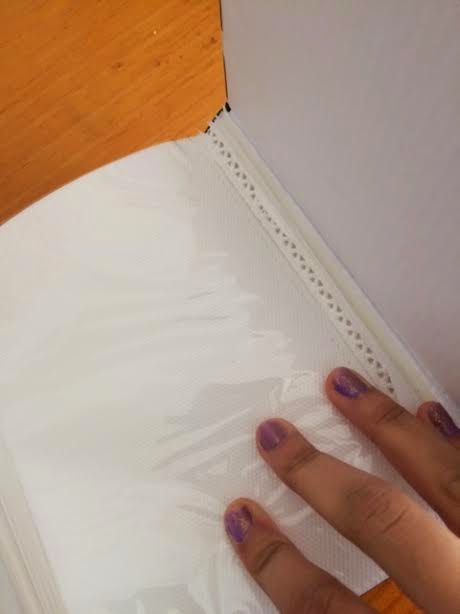
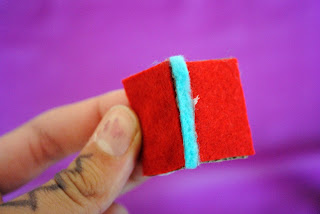
Now, for the spine, get a thin piece of felt, paper, ribbon, etc and glue it on the part where the spine should be.


Step 5

There's still parts where there's brown from the cardboard. So in order to cover those, take some thin slips of felt or paper and cover those parts. 

Make sure you put the felt/paper in the spots where they make sense. I put paper strips on the top and bottom, that's what a normal book would feel like. And then I put felt on the sides, to make it like a book jacket.


Step 6

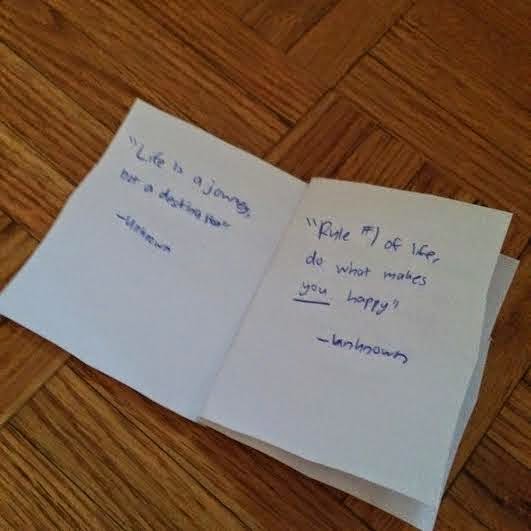
If you want to, you can write in it! I just wrote random things. Just letting you know, it's difficult to write in some parts so xD


Step 7

You're finished! You can make it a little charm, add it to a necklace, give it to your dolls, make a bunch and give them to your friends, or put them with your books!

The possibilities are endless. So have fun with your mini book :D You can also just bask in its adorableness :P


I hope you enjoyed this DIY, it was really fun to make and I think you guys will have fun making it too :) Customize them to your liking!

P.S - I finally got a tripod! It's really cool and works amazingly. *dances* My outfit posts should improve drastically xD

Thanks for reading,
Noor

Thursday

Spring Cleaning Tips + Flower Garland Room DIY

Hello everyone! As promised, I will be doing a DIY today! But first, I would just like to quickly apologize about my slight absence from the blogging world. I had a family issue and wasn't able to be connected, but that's all over, so I am back! Now, let's get into the post :D

 
 yay title pic XD
 
 
TIP 1: Clean out that shame-space.
 
We all know that one spot. That spot where you throw all of your stuff that you don't know where to put. Face it, and clean it out. You might even end up finding some old stuff that you thought was lost.
 
 
TIP 2: Clean your bed first.
 
Even though it is a small spot, cleaning the bed is the big deal. Take all of those clothes and books off and put them in their spots, make the bed, and...woah...your room looks like 10 times cleaner.
 
TIP 3: Listen to music.
 
This may be the stupidest tip ever but, listening to music makes it much more fun. I think that's common sense, considering music makes almost everything better, but still, LISTEN TO MUSIC.
 
 
DIY: Flower Garland for your room.
 
You Will Need
-Colored tissue paper
-Tape or stapler
-Thick and thin string
-Scissors
 
STEP 1: Make the tissue paper balls
 
 
Rip (or cut if you want to be exact) pieces of tissue paper and roll them up in balls. (You can have your younger sibling do this if you want, my little cousin had a blast rolling them up :P)
 
 
STEP 2: Attach tape to your balls


Take your thin string (I used green thread to make it look like stems for flowers) and attach it to the back of your tissue clumps (you'll have to unroll your balls first) and clump them back up. Now, make sure you leave some thread at the end for tying. Now cut.
 
 
STEP 3: Attach the balls to the thick string.
 
Take your thick string or yarn (I actually fingerknitted a thin scarf with some colored yarn)
 
 blurry, sorry :/
 
 
I then took my balls and tied them (using the little tail of string we left) to my yarn. This takes time, so be patient. I would also suggest double or even triple knotting them.


blurry again :(
 
STEP 4: Display!


I decided to display mine over my whiteboard, but you can do it wherever you want! I would suggest above your bed, or above your door, but anywhere looks great! (PS, double tape it, it falls down easily)
 
 
I hope you enjoyed and I just wanted to let you know, the contest winners will be announced next post :)
 
Mkay bye,
Noor

Friday

Pintertest: DIY Wall Art

Hello everyone! I saw a lot of comments on my last post on Nanowrimo asking the following questions, so let me answer them:

Is it too late to join Nanowrimo?
Nope! You will have to put more effort into it but you should be fine :)

Can you join in the UK?
I'm actually not sure, I bet you can though!

Now to the post! A couple of days ago, I saw this pretty awesome pin on Pinterest:

Tape painting: Here is how we did it:  - bought a big canvas and sprayed it metalic gold (2 layers)  - added a pattern using washi / masking tape  - painted the shapes using different colors acrylic paint  - gently remove the tape
credit not found

Pretty cool huh? So I decided to try this for myself.

YOU WILL NEED:
-One big sheet of paper or blank canvas.
-Tape
-Paint
-Patience

STEP 1: Putting the Tape On

So get your paper and tape and start putting pieces of tape everywhere to create geometric shapes, big or small!


STEP 2: Start Painting!

Now grab your paints and, paint! It's okay if you get it on the tape, that's what it's for!


STEP 3: Rip off the tape.
 
This is where patience comes in handy. Being me, I just ripped the tape right off, not going slowly and some of the paper went with the tape. AHH! I had to fix it with more paint. D:
 
 
STEP 4: Display!
 
(Sorry for picture quality, bad lighting) Now show off that baby!


If you do this project, be sure to send me a pic on Instagram or Google Plus! I hope you enjoyed today's Pintertest!
 
Have you ever tried any Pintertests before? Did they go as planned, or fail?
 
Mkay bye,
Noor


Saturday

DIY Valentine's Day Room Decor

Hello everyone!! Annddddd it begins. The weeks of Valentine's Day. For all you anti-love people, I am advising you to X out of this post. But don't frown, I have a special anti-Valentine's Day post coming up soon. Also, thank you for all for the amazing comments on my last post, you are amazing!!! Let's get into this post.

For this DIY I am going be showing you 3 different ways to decorating with one simple procedure.

THE PROEDURE

So basically, we will be cutting hearts.

STEP 1:
Grab a piece of paper and scissors


STEP 2:
Fold your paper and cut out half a heart
 
 
Unfold and you have a heart. Now let's see how we can turn this simple heart into something amazing.
 
Heart Wall Collage
For this DIY, all you need are a bunch of hearts and tape. I arranged all the hearts on my door and it made this super cute heart collage. You can arrange them however you want. You can even make the hearts into one big heart!!


Hearts For String Lights
These days, a lot of people have string lights in their rooms. I decided that it would be cool to attach hearts to them! All you need to do is cut little rectangular boxes out of the heart and sliding them onto the lights.
 
TIP: The slits shouldn't be so big!
 
Slide through like so


Heart cutout wall art
Okay, so you have all of these cutout hearts...what do you do with the scraps? Turn them into cute wall art of course. I taped mine to my wall and it looks very nice.


Welp, I hope you enjoyed and be sure to use the hashtag #sunshinediy if you do any of these! Leave a comment down below sharing what you would like to see on the blog :)
 
Mkay bye,
Noor


Wednesday

DIY: Pinterest Inspired Room Decor

Hello everyone! I'm back with some more DIYs for your room. I'll be doing another one of these soon but with Valentine's Day stuff. These are super easy and you should have some of this stuff lying around your house. I have 3 DIY's for you so let's get started!

DIY #1- Crayon Covered Jar

YOU WILL NEED:
An empty jar (I used a candle holder)
Crayons
Hot glue gun

STEP 1:

Gather up your crayons and figure out which ones you will be using. Now, take your hot glue gun and let it warm. (PLEASE ASK A PARENT BEFORE DOING THIS) Now, grab your crayons and start glueing. Be careful not to burn yourself. Do not take off the wrappers, you will just melt the crayon.


sorry for the picture quality

This is going to take a while but it is the only step so it's totally worth it. 

Once you've covered the whole holder, it should look like this! I put my crayons in the holder so I hope I don't grab a crayon that is glued down :o 


DIY #2- Whiteboard Made From A Photo Album

YOU WILL NEED:
A photo album
Tape
Scissors

STEP 1: 

Grab your photo album and start ripping out pages


These pages are actually whiteboard like so you can use whiteboard markers and it will erase perfectly.

STEP 2:

Now you can arrange your pages on the wall and you can even stick paper in them to make them look nicer. I added washi tape for decoration.


This is great for organization and I use it for blogging, DIYs, and school stuff. It is also really big so I can see it every time I walk in my room. (My computer is marking DIY as a wrong word, what.) 

DIY #3- Washi tape quote

YOU WILL NEED:
Washi tape or duct tape

STEP 1:

This one is super easy, all you need to do is make a word with washi tape. I did "DREAM" although it is kinda messy.


That's all for today folks! I hope you enjoyed and if you do any of these tag me on Instagram at @alittlebitofsunshine.blog or on Google+ and in both places use the hashtag #sunshineblogdiy I have a fun guestpost for you on Friday so stay tuned!

Mkay bye,
Noor

Saturday

12 Days of Holiday Fun: (Day 4) DIY Gift Crafts

Hello everyone! Today, I am FINALLLYYYY doing that craft post. I have two crafts for you. Let's get into the post! IT IS LONG. JUST A WARNING.

DIY "Reasons Why I __You" Heart Chain

YOU WILL NEED:
Paper
Markers
String or pipecleaner
Tape

STEP 1:


Take one piece of paper and fold in half. On the crease, cut out a half-heart. Do this a couple of times (depending on how many hearts you want.


It should look like this. (I chose to do 4 of them)
 
STEP 2:


Now, think about what you like about the person you are giving the gift to. On each heart, write one reason.
 
STEP 3:


I was lazy and I taped each heart onto a pipecleaner but you can cut holes in the top of the heart and string them onto a piece of twine or yarn.


You can put them in a cute little bag like this and then you're done!


Little Book Of Quotes
 
YOU WILL NEED:
Paper
Quotes
Pen
 
STEP 1:


Make a book like thing (we all know how to do this)
 
STEP 2:


Start writing little quotes. My favorite is: "Life is a journey, not a destination"


Now you're done! VOOOOOIIILLLAAAAAAAAAAAAAA! VOILA
 
 
I hoped you enjoyed these crafts as much as I did!
 
Thanks for reading,
Noor 


Sunday

Roomspirtion: My Room!

Hello everyone! Today I have a roomspiration post but I first wanna talk about something that I hate.

 I don't wanna be that kind of complainer person but my biggest pet peeve is when someone promotes their blog on someone else's, and then like asks to be tagged or something. Like, did you even read the post? Do you just wanna be promoted? Go do that somewhere else, not here. Sorry for the rant I just had to talk about that.

Okay now let's check out my newly decorated room for winter! Its not complete but its almost done!


Here's my door! I made a sign out of origami paper and ribbon. Here are the simple steps:
 
1) Get a bunch of pieces of paper, two for each letter of your name.
2) Make a heart or different shape out of (enter number of letters in name/word here) pieces of paper.
3) Glue that shape onto another piece of paper and when you've done that with all of your shapes, write out the word, string onto ribbon and voila!


This one is probs my favorite! Just make a calendar, on your wall. It's pretty self-explanatory. It's really cute and in December, you only have to make one new number! If you wanted to do reminders or something you could sticky note the reminders on the day.


My desk is really messy but I sorta organized it to my liking. I liked how my lotions were all organized and I found this super uber cute tray so I put my nail-polishes in it.


Sorta blurry pic but whatever. I have some cute had sanitizers which I collect! My favorite things are the tea lights and the little Aries picture that my aunt gave me.


The coolest thing about my bed is that it has a bookshelf built in! I bought some fake flowers and put them down there. I also have my books organized by series.


I made this by hole punching the middle of some snowflake doilies and stringing them onto a piece of ribbon!


I also taped some snow flakes to my ceilings!
 
 
I hope you all enjoyed today's post and tell me your fave thing about your room down below!
 
Thanks for reading,
Noor


Saturday

HAPPY HALLOWEEN!: Special Halloween Post

Hey everyone! Its Halloween and I've just ended the night! I'm gonna share with you all the highlights and stuff but unfortunately, I forgot to take pictures... I will try to share a pic of the costume on my About Me page.

MY COSTUME
This Halloween, I was the 11th Doctor from Doctor Who! I loved my costume it was super awesome with the sonic and everything!!

I had an olive colored trench coat, white shirt, black tights, black skirt, fez, and bowtie.

FRIEND'S COSTUME
My friend Carlin had a party and it was super fun!!!

They had a lot of cool decorations like spider webs, fake bloody fingers, etc.

My friend's costumes were: Emma G-Monster, Hannah G-Panda, Carlin-Pink Lady from Grease, Mia-Baseball player, Meghan- Robin Hood, Katelyn-Softball player, Anna-Pirate, and Alexia-Marty the business man.

We played several games like, pop the balloon with your knees, try to get as much sweets as you can in your mouth, wrap someone in toilet paper.

For food we had: pasta, cookies, gummy worms, chips and salsa, Oreos, and Cheetos.

TRICK OR TREATING

I got a lot of candy, my bag was so heavy when we were done. My favorite one was the small pack of Kit-Kat minis!

One house was totally decorated and they had super cute emoticon pumpkins.

My friend Molly was dressed as a creepy clown and Hannah got soooo scared when Molly started following her and didn't know who she was.

DECOR

Our pumpkin looked like one of those "knocked out teeth" pumpkins. It was my first time carving by myself and it was super fun!

We hung up some fairy lights that were orange, black, and purple.

We also had these pumpkin, mummy, and skeleton figures that lit up so we put those out.

BEST PART

The best part was probably when we went trick-or-treating. We all laugh and sang along the way and had a great time with each other. We even went nearby my old house and said hello!

I hope you enjoyed and sorry for the lack of pictures, I totally forgot! See you on Sunday!

Thanks for reading,
Noor

Thursday

My Halloween Decor

Hello everyone! I know, I've been doing a lotttttttt of Pinterest idea posts but they are just soooo cool and fun. I've decided to post some ideas of décor that I am planning to do and how I might be doing it.

Saturday's post will be a transition into the exciting posts for next week which you will find very exciting because these are the secret posts. Can't wait to see what all the bloggers have planned for next week!

 
This one is actually really simple and easy. My mom said I could make the webs and then hang them up with fake spiders. (We have left overs from last year)


I personally love the banner. My grandma has some fabulous orange ribbon that would work perfectly for this project. The pumpkin is cute too.
 
 
This looks super simple and can be done with paper, string, and imagination. I will probably use black, orange, and white paper and maybe use some candy corns too.
 
Link same as above!
 
These look simple to make. Cardboard+ gray paint+ painted roses and letters= tombstone.
 
 
My mom loved this one. We have a bunch of old tea lights so this is perfect...
 
 
I hope you all enjoyed today's post as much as I did. Next post, I'll try to talk about costumes so be sure to tell me about your costume and I might feature it next post!!
 
 
Thanks for reading,
Noor